Ever since a good friend's birthday less than a month ago, I have been wanting to try and make my own macarons. We went to lunch at the Little White House's Salon Cafe and for dessert enjoyed the most lovely "Macarons de Paris" -- so I thought I would give it a try.
Wow. It was much harder than I thought. My first batch turned out awful. They were flat, lifeless little morsels. They actually didn't taste too bad, but the beautiful thing about a macaron is that they not only taste amazing, but they look incredible too, and mine was not up to standard.
Here is what my first batch looked like:
After every failed attempt, I combed through the hundreds of websites about making macarons, trying to find an explanation for what I did wrong. What I did find was that there are a thousand-and-one different ways for making macarons.
Some say that you need to use aged egg whites, others say you need to let the piped macarons sit out before putting them in the oven. There are even some websites that give you crazy detailed instructions for every step, like putting them in the oven at 300 degrees for 10 minutes, then lowering it to 280 for 5 minutes, then at the 16 minute mark you need to stand on one foot and hop, while you raise the temperature to 285 degrees. Ok, so I might have made that last bit up. But seriously people, what works for some might not necessarily work for others. I learned that the hard way.
I did find one website that seemed to help best. The author's name is Stella Parks, she is a professional baker who loves what she does. In her blog, she breaks down the top 10 myths about making macarons and I was relieved that I wouldn't have to try the thousand-and-one different ways I found on the internet. Instead of 1001 tries, it just took me 4!
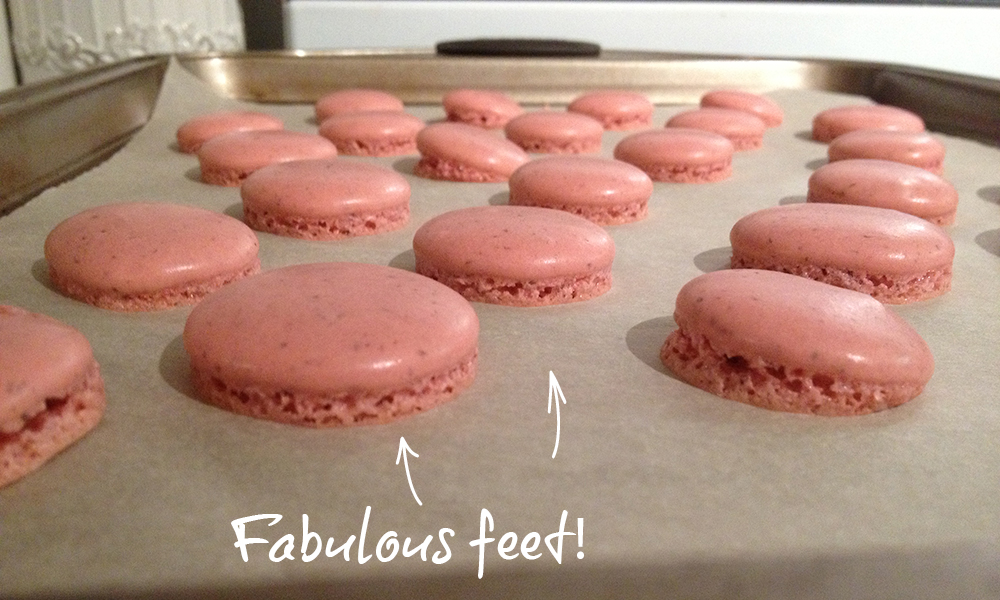
I have to admit, when I put my fourth batch of macarons in the oven, I sat next to it with the light on. I just wanted to see those beautiful little "feet" form! About 1/2 way through baking, I saw them. I called hubby over and asked him to check, in case my vision had been impaired by my aggressive internet searching. He confirmed it. I was elated. Seriously. Is it weird to get that excited over food? Hmm...
Here is my beautiful, vanilla buttercream filled macaron. Mmmmm...
Check out those gorgeous "feet"!
Ok, so I really don't want to add one more macaron recipe to the world wide web, but I've had some friends ask, so I'm going to give you the recipe I used and what worked for me, but I am in NO WAY saying that this is THE way you make a macaron. Like I learned from Stella, you just have to find what works best for you.
I didn't want to massacre hundreds of eggs while I fiddled my way through, so I changed some of the recipes I found to suit using just one egg white.
Macaron Recipe: Makes about 10 macarons
1 egg white, room temperature
3 tablespoons berry sugar {same thing as castor sugar}
3 tablespoons and 2 teaspoons almond meal
1/2 cup icing sugar
1 - Line baking sheet with parchment paper.
2 - Pre-heat your oven to 280 degrees. Move oven rack to middle of top half.
3 - Sift almond meal and icing sugar. This was a frustrating step, but it really makes a difference. See how smooth that last macaron came out? It was because I paid special attention to sifting it. My almond meal was purchased from Trader Joe's and I found that a good portion of the almond meal, about 25%, didn't fit through my sieve. Instead of trying to force them through and waste my time, I just threw the larger bits out and added more from the bag (side note - I tried processing the larger bits of almond, but I found that it made the almond meal more "sticky" and they still wouldn't go through the sieve).
4 - Whisk egg white and berry sugar together until stiff peaks form. This took me a while (almost 15 minutes!), but I used an electric hand mixer. If I had a KitchenAid mixer, I think the peaks would form a lot faster. *also, some people say you need to slowly add the sugar while your beating the egg white. I didn't do this and I think it turned out just fine.
5 - After your stiff peaks form, add your favourite gel food colouring and mix for one more minute.
6 - Now comes the hard part - the macaronage. This part takes practice. I would recommend checking out this YouTube clip to see what your mixture should look and flow like. Add your sifted almond meal/icing sugar mixture to your egg white and fold the mixture. You know your mixture will be ready when it slowly falls off your spatula like lava, and can eventually incorporate back into the rest of the mixture. Again, check out the video.
7 - Once your macaron mixture had been perfectly folded together, add it your piping back, and pipe out circles about the size of a quarter. They will spread out slightly. Tap or bang your baking sheet on the counter to get out any bubbles that might be trapped in the macarons. This is one step that MUST be done.
8 - Put your macarons in the oven and bake for about 15 minutes. You know they will be done if you tap on a macaron and it's nice and hard. Also, if you try and take a macaron off the parchment, it should come off cleanly. If not, put it back in the oven for a couple of minutes.
9 - Let the finished macarons cool on the baking sheet for 5-10 minutes. Fill with your favourite filling: nutella, jam, chocolate ganache, or my favourite: vanilla buttercream. Click here for the vanilla buttercream recipe that I used.
10 - Eat and enjoy! They say that macarons are best after one day and I would have to agree, so put the macarons in the fridge and take them out the next day so you can enjoy them to their fullest!
- Lindsey